Claim Your Free Design Consultation Today
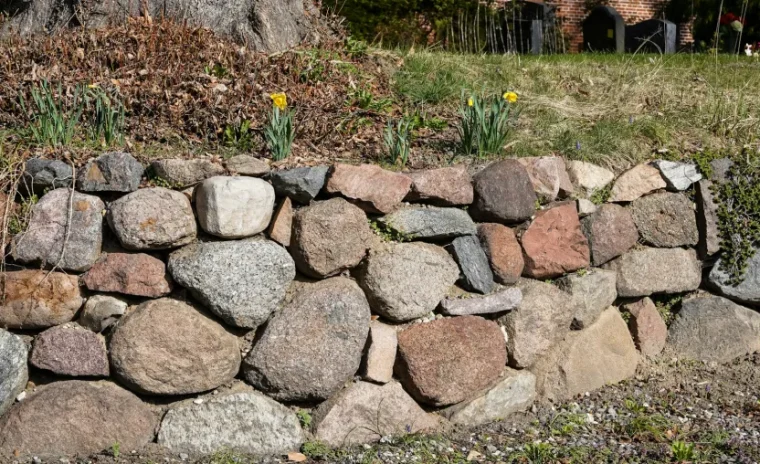
Build a Stone Retaining Wall That Stands Strong for Decades
Assess Your Site and Plan the Wall Dimensions
Before any stone wall construction begins, a thorough site assessment determines the success of your project. Measure the slope and calculate the total vertical rise you need to retain. For walls under three feet in height, most homeowners can proceed with a gravity-style design, relying on mass and proper setback for stability. Walls taller than four feet typically require engineering consultation and often benefit from working with a masonry contractor who can assess soil conditions and drainage requirements.
Mark your wall’s footprint using stakes and string, ensuring the line follows the natural contour or creates the desired terrace. In Beverly, MA, our clay-rich soils and seasonal freeze-thaw cycles demand extra attention to drainage planning. Measure back from your string line at least twelve inches to accommodate the gravel base and allow working room during construction. Document any utilities in the area and contact local authorities for required permits. Walls exceeding certain heights or located near property lines often require approval.
Calculate the volume of stone you will need by multiplying wall length by average height by average thickness (typically 18 to 24 inches for gravity walls). Add fifteen percent for waste and selection. Professional retaining wall contractors typically order stone in tons; a general rule estimates one ton covers approximately 35 to 40 square feet of wall face, depending on stone type and thickness.
Excavate and Build a Stable Gravel Foundation
Proper excavation creates the foundation that prevents collapse. Dig a trench along your marked line, extending at least six inches below grade for every foot of wall height above grade. For a three-foot wall, excavate approximately 18 inches deep. The trench width should accommodate your stone thickness plus six inches behind for drainage aggregate. Remove all organic material, roots, and loose soil; these compress over time and cause settling.
Level the trench bottom and compact it thoroughly using a hand tamper or plate compactor. Fill the trench with three-quarter-inch crushed stone to a depth of at least six inches, creating a free-draining base that resists frost heave. In regions like Beverly where winter temperatures regularly drop below freezing, this gravel layer serves as a critical frost barrier. Compact the gravel in two-inch lifts, checking level frequently. The base must be perfectly level from side to side; a slight backward slope of one inch per four feet of height helps the wall lean into the retained soil.
Install perforated drain pipe along the back edge of your gravel base if your wall will retain more than two feet of soil or if you observe groundwater during excavation. Wrap the pipe in filter fabric and position it so it outlets beyond the wall ends. Many landscaping services include subsurface drainage as standard practice because water pressure remains the primary cause of retaining wall failure.
Select and Position Your Foundation Stones
The foundation course carries the entire weight of your wall, making stone selection critical. Choose your largest, flattest stones for this base layer. Ideal foundation stones measure at least 18 inches long, 12 inches deep, and six to eight inches thick. Avoid rounded or irregular stones that rock when placed; each stone must sit firmly without wobbling. Working with a retaining wall contractor provides access to professionally graded stone selected specifically for structural applications.
Place each foundation stone directly on the compacted gravel, setting the best face forward and ensuring the stone slopes slightly back into the hill. This backward lean, called batter, should measure approximately one inch for every 12 inches of wall height. Use a four-foot level and measure from the base to check this angle consistently. Fit stones tightly together, minimizing gaps and avoiding continuous vertical joints that create weak planes. When you encounter a gap, select a stone that bridges it or use smaller stones to fill, always maintaining contact between neighboring stones.
Periodically step back and sight along the wall face to ensure your course runs straight and true. The foundation course establishes the line and batter for all subsequent courses. Once satisfied with the placement, backfill behind the first course with crushed stone to within two inches of the top, filling voids and providing drainage. Compact this backfill lightly to avoid shifting the stones. Many professional masons in Beverly work methodically, completing and backfilling each course before proceeding to maintain stability throughout construction.
Stack Successive Courses for Maximum Strength
Building subsequent courses requires attention to three structural principles: maintain consistent batter, stagger vertical joints, and maximize stone-to-stone contact. Select stones for each course that bridge the joints below, similar to laying bricks in a running bond pattern. This interlocking arrangement distributes loads and prevents the wall from splitting along vertical seams. Avoid stacking small stones directly on top of each other; instead, let each stone span across at least two stones below.
Continue the backward lean established in the foundation course, checking batter with your level every few stones. Place each stone so it tilts into the retained soil, and select stones with relatively flat tops and bottoms to maximize bearing surface. Through-stones, also called tie-stones or deadmen, should appear every four to six feet horizontally and every 12 to 18 inches vertically. These long stones extend deep into the retained soil, anchoring the wall and transferring lateral pressure back into the hillside.
Fill voids behind the wall with crushed stone as you build, maintaining drainage and preventing soil from infiltrating the wall structure. Avoid using mortar in a dry-stacked gravity wall; the flexibility of unmortared joints allows slight movement without cracking, and gaps promote drainage. Professional stone wall construction teams typically complete two to three courses per day on residential projects, allowing time for careful stone selection and fitting. If you find yourself forcing stones into place or creating unstable arrangements, consult with a masonry contractor who can assess your technique and recommend adjustments before problems develop.
Finish with Capstones and Establish Maintenance Practices
The cap course provides a finished appearance and protects the wall from water infiltration. Select flat, broad stones that overhang the wall face by one to two inches, creating a drip edge that sheds water away from the structure. Capstones should be relatively uniform in height to create a level, walkable surface if desired. Many homeowners choose to mortar cap stones in place for additional stability and a more formal appearance, even when the rest of the wall remains dry-stacked. If you mortar caps, apply construction adhesive or mortar only to the top course, ensuring each capstone bonds securely.
Complete the backfill to final grade, sloping the soil away from the wall at a minimum of two percent to encourage surface drainage. Compact backfill soil in six-inch lifts to prevent settling that might create depressions that pool water. Install filter fabric against the back of the wall before backfilling if you have not already done so; this prevents fine soil particles from washing into your drainage aggregate and clogging the system over time.
Establish a maintenance routine that includes annual inspection of the wall face for loose or displaced stones, checking drainage outlets for blockages, and monitoring vegetation that might root behind the wall and create pressure. In Beverly, spring inspections after freeze-thaw cycles help identify minor issues before they become structural problems. While well-built stone retaining walls require minimal maintenance and last decades, professional landscaping services can perform periodic assessments and address repairs promptly. Properly constructed walls with adequate drainage and correct batter will serve your property reliably for generations, controlling erosion and creating usable terraced space.